
I wanted to have two buttons on my phone’s screen. One to turn on my desktop computer, and another to hibernate it with a single tap. Of course, this needed to work from anywhere. I’ll share what I learned with you so you’ll also be able to turn on your computer from anywhere in the world.
How is it going to work and what do I need?
I tried many apps and solutions and have almost given up. That is until I pieced together a geeky but advanced method. Consequently, I wrote this article to help you set up a chain of devices to accomplish a seemingly simple task: to hibernate or turn on your computer from anywhere. Here is how it’s going to work, in a nutshell. You tap a Tasker widget on your Android phone home screen. With a plugin for Tasker, it logs in to the Raspberry Pi via SSH to locally send a Wake-on-LAN (WoL) packet to your computer to turn it on. The other button uses SSH to log in to your Windows 10 computer and execute a command to hibernate or shut it down. So, you’ll need:
- Android phone with Tasker and SSH Tasker plugin (paid)
- Router with port forward feature
- Raspberry Pi (or any home server running Linux)
- Desktop computer with Windows 10, connected via Ethernet cable
The struggle is real
So, why not use some of those “simple magic” apps that promise to turn on your computer from anywhere? They mostly don’t work, because of oversimplified requirements. These apps don’t calculate with things like a crappy ISP router that many of us have. I’ve found that for reliability‘s sake, WoL only works locally (hence the “Local” in its name). However, we want Wake on WAN.
You either need a proper router or a Raspberry Pi (or any other home server). I already had the latter, which is always on and helps me go around the limitations of the router. The main benefit of using these methods is their universality. It’s not about showing you a proprietary app that tries to control your computer. It’s about using multi-purpose and geeky tools you might already have or should have on your devices either way. If you venture into geekdom, you’ll find yourself having shell access to all your devices soon enough. If you are into remote control and automation, you’ll cross paths with Tasker for Android.
I hope you’ll learn something from this article, even if your use case is slightly different. It was hard coming up with a title since the process is entangled. It reaches into many different technologies and the ability to turn on your computer from anywhere might just be a side effect. The end result is very flexible, allowing you to have buttons in Android that do anything on your home network. While one could also adapt the process to different devices (like Apple), I can only share what I experienced.
Home network configuration
Port forwarding in the router
First and foremost, let’s get this out of the way. The only thing required from your router is opening ports to allow login over SSH to your devices. Virtually every router should be capable of this simple task. Since this tutorial is advanced, I’m not going to explain how to do this as there are tons of resources available on the matter. Also, every router’s interface is different. At least, it doesn’t need to support forwarding WoL magic packets.
Forward port 22 to your desktop computer that is running Windows 10. It helps if that computer’s local IP doesn’t change. Make it assign its own local IP or DHCP reserve one for it.
Forward port 2222 to Raspberry Pi or your home server. The reason behind 2222 is not security through obscurity, but merely that we need two different ports to target two different devices behind a single IP.
Accessing your network from outside
You need to know the IP your ISP assigned to you. Fortunately, I already wrote an article that frees you from this burden. Since you need to have a Linux home server for this anyway, you might as well just Use Cloudflare as Dynamic DNS with Raspberry Pi. From this point on, I’ll refer to the home network’s address as the home.example.com host.
Desktop computer configuration
Setting up your computer to receive WoL packets
It’s another aspect that’s not necessarily the scope of this article. Every UEFI or BIOS is different. The only thing I can do is to point you in the right direction. It’s possible that Wake-on-LAN is turned off there, so look for that setting before digging around in Windows.
Taking a look at the network adapter properties
The network adapter can also have this feature disabled.
- Once in Windows 10, Hit Windows+R and run
ncpa.cplwhich opens the Network Connections window. - Choose your adapter, then right click menu > Properties > Configure > Advanced tab.
- From the list there, find Wake on Magic Packet and ensure it’s Enabled.
- On the Power Management tab, check “Allow this device to wake the computer” and “Only allow a magic packet to wake the computer”.
Getting the MAC address of your desktop computer
- Open the Windows+R window
- Run
cmd /k ipconfig /all - Look for Physical Address for the first adapter which looks something like
01-23-45-67-89-AB. Note it, but change the dashes to colons, like this:01:23:45:67:89:AB(both notations are correct, but Etherwake needs colons).
Installing SSH server on Windows 10
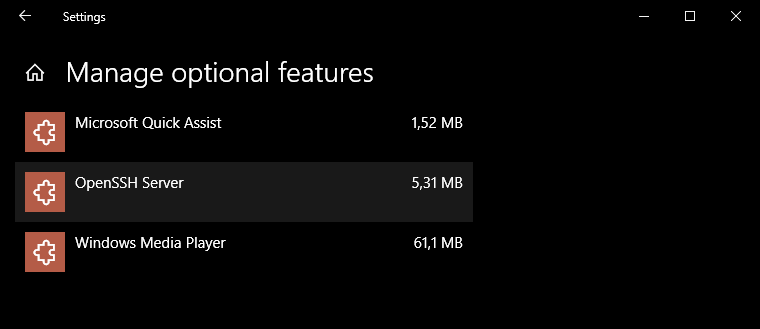
Windows 10 includes an SSH server, but it’s hidden by default. Search the Start Menu for Manage optional features then click Add a feature. You’ll find OpenSSH Server and click Install.
If your Windows 10 is up-to-date, this is no longer a beta thing. I recommend updating your Windows before this! You don’t need to install the client.
- Once done, restart.
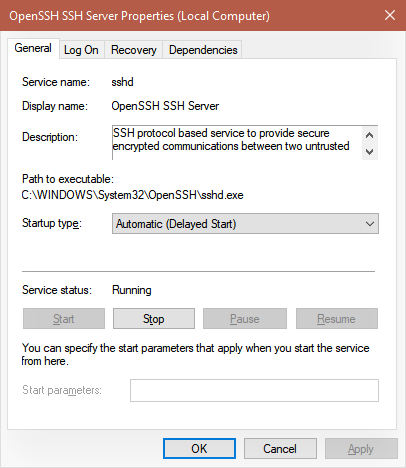
- Check Windows+R and run
services.mscto see the services list. - Find OpenSSH SSH Server service and set it to Automatic (Delayed Start).
- Try to start the service and hope for the best. If you are stuck at this and the service won’t run, Google this: openssh server Windows 10
Your Windows username and password
SSH requires a password unless you use SSH keys (too far into geekdom for me, for now). The easiest way is to set a password for your Windows user. Perhaps you already have one. I like to see how fast my computer boots up to the desktop. I’m not moving the computer anywhere, and I’m the sole user. Therefore I don’t want a password. Technically I do have one, but Windows doesn’t enforce it. It’s possible to skip the Windows 10 login screen (Windows+R and netplwiz).
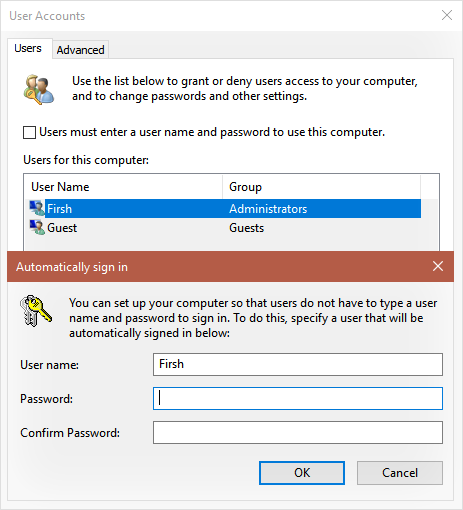
So you can be lazy in a way that you don’t need to enter a password every time you want to use the computer but still have it. This password (for SSH) needs to be secure as it has the capability of giving full access to your machine.
Raspberry Pi or home server configuration
Setting up the SSH server on Raspberry Pi
The official documentation helps with this, but it’s straightforward. In Raspbian, go to the Menu > Preferences > Raspberry Pi Configuration > Interfaces tab: select Enabled next to SSH then click OK.
To change the port to 2222, open the terminal and run this:
sudo nano /etc/ssh/sshd_configChange #Port 22 to Port 2222 then press Ctrl+X, then Y to save then Enter when asked where to. Restart the device.
Installing and using Etherwake on the Raspberry Pi
Install Etherwake by running this:
sudo apt-get install etherwakeIt allows you to execute a simple command with the target device’s MAC address to wake it up. To use and test it, turn off or hibernate your desktop computer. Then issue this command from a terminal:
sudo etherwake 01:23:45:67:89:ABYou need to replace 01:23:45:67:89:AB with the real MAC address of the desktop computer’s network adapter. You should only continue to the Android config if this worked.
Your Raspberry Pi username and password
The username is pi (not root) for SSH. You need to set a password (it won’t make your life harder, unlike a Windows password). Again, follow the official documentation into securing your Raspberry Pi (just the Change your default password section, not necessarily the whole thing!).
Android configuration
The two required apps: Tasker and SSH Tasker plugin
Go to the Play store and buy Tasker and SSH Tasker Plugin. I tried numerous other combinations and plugins, none of them worked. Trust me; I would have preferred a free solution too. However, everywhere I looked I was running into this Tasker thing. It can do so much more, so maybe the purchase is justified by its greatness. The SSH Tasker plugin allows you to save multiple different connections, and that’s what we need as there are two SSH servers.
You’ll notice that Tasker now runs as a permanent notification. For now, you are not using any automation and triggers or sensors that require it running all the time. Therefore, you can turn off this aggressive persistence by unchecking Preferences > Monitor > Run In Foreground and Show Notification Icon.
The task that hibernates or turns off your computer
- Go straight to the Tasks tab and create a new one with the name like Hibernate or Shutdown or whatever.
- Add an action and write ssh into the filter (there’s too many to try to find it manually) and choose SSH Plugin.
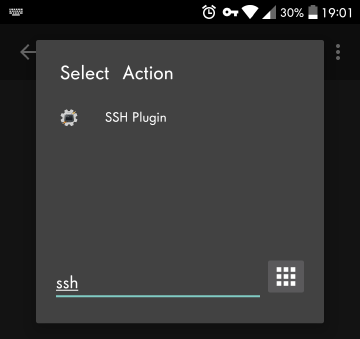
- Tap Configuration and fill it with the following details:
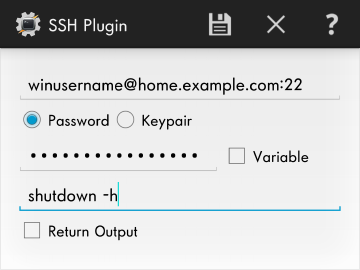
# Address:
[email protected]:22
# Password:
Your windows login password.
# The remote command for hibernation:
shutdown -h
# OR the remote command for forcing shutdown:
shutdown -f
It’ll look something like this:
This task will turn on your computer from anywhere
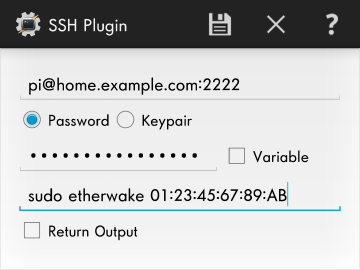
1. Create a new task with a name like Wake.
2. Add action; Filter for ssh, then choose SSH Plugin.
3. Tap Configuration and use the following details:
# Address:
[email protected]:2222
# Password:
Your password on the Raspberry Pi belonging to the user pi.
# The remote command for waking up your computer:
sudo etherwake 01:23:45:67:89:AB
It’ll look something like this:
Creating home screen widgets from the Tasker tasks
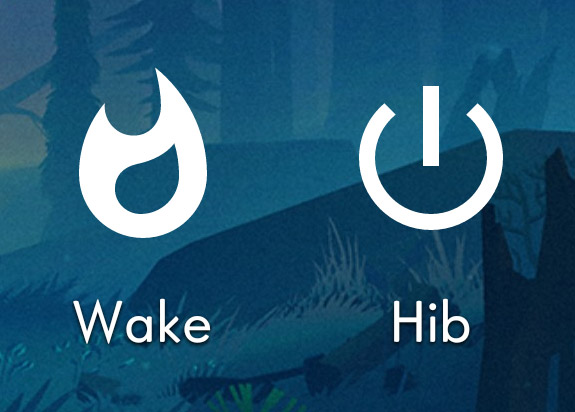
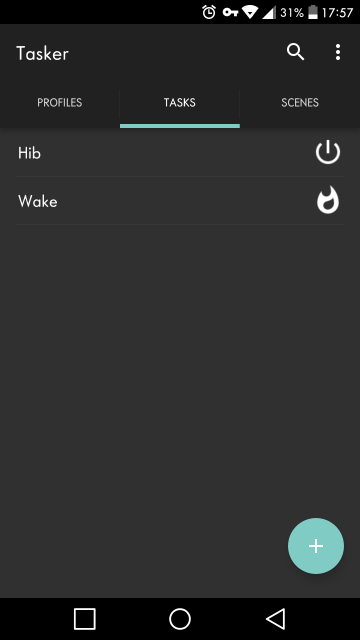
You can have a fancy icon for your tasks. Experiment with the icons before making a widget out of them. I chose a flame for turning on (I wonder: what’s the symbol for turning on something?), and the generic power button Material icon for the hibernation.
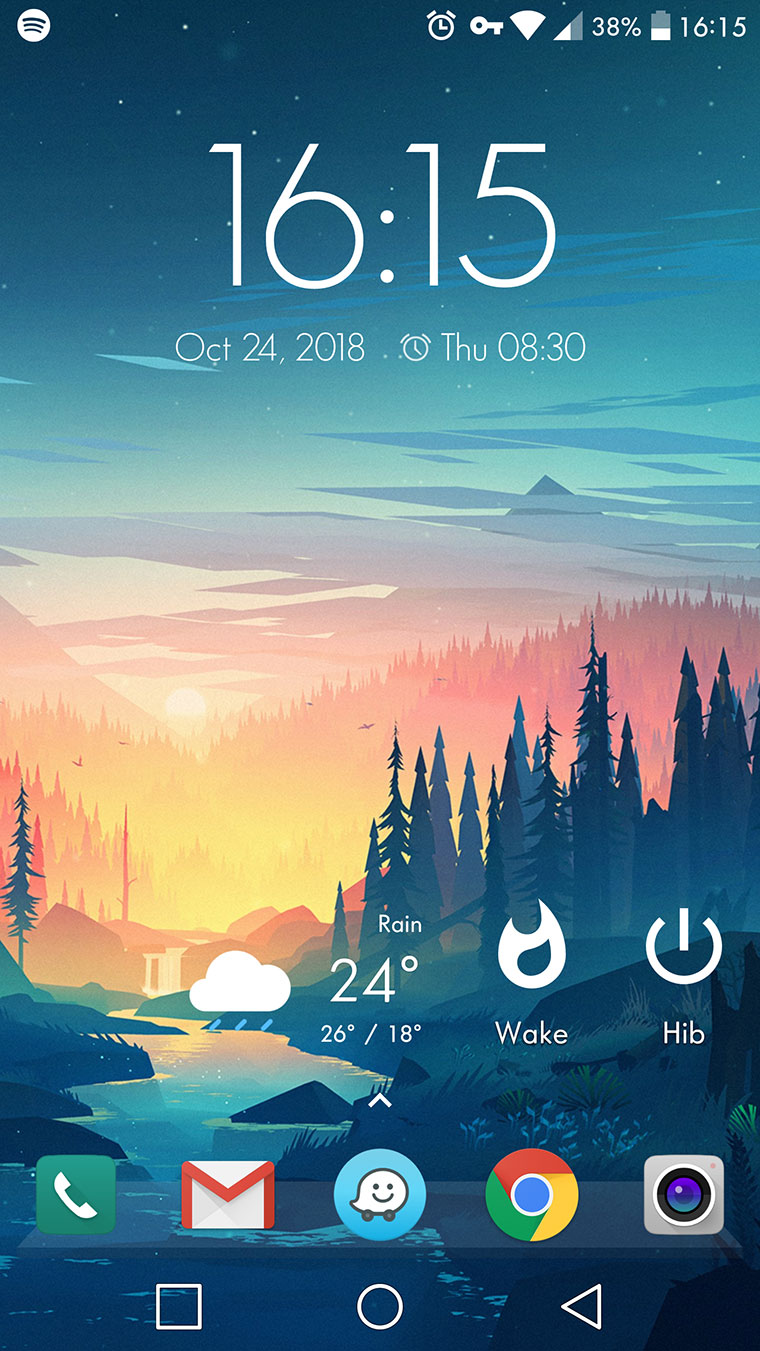
Go to a screen on which you want to see the buttons. Depending on your Android Launcher (I use Nova Launcher), you’d likely long tap on the free space to add a widget. Find Tasker, and choose the one called Task, not Task Shortcut. The latter wasn’t working so well for me. Choose the task that you want, then repeat this for the other one. Test your buttons, if everything went well, they should work, even without Wi-Fi. You do need data connection, though.
In case you are wondering, my wallpaper is Small Memory by Mikael Gustafson. And my home touch buttons are aligned that way because I converted from a Samsung phone to LG.
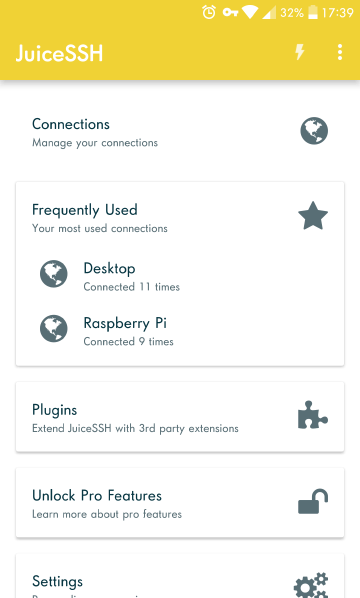
Optional: Testing with the free JuiceSSH
If for whatever reason you want a free approach, you can try JuiceSSH. It’s an excellent SSH client, that allows you to save different connection details, so you can reach the shell of your devices quickly and for free. If you are ok with not having a single-tap widget and are comfortable by writing the two commands by hand, then by any means use JuiceSSH. Their paid version might allow you to have the widgets, but it’s more expensive than Tasker.
It’s also useful to keep JuiceSSH installed, in case you need to run commands other than those for which you preconfigured Tasker tasks. There used to be a JuiceSSH Tasker plugin (now it’s missing from the Play store) that had crashing problems. However, on its own, JuiceSSH is decent, and I like it.
Conclusion
I like connecting different services to create something more significant. Although it took me almost a day to figure out all of this, I find joy in being able to share the process with you. Why would someone want to control the power state of their desktop computer remotely? Imagine that you are on vacation and because you are a bit eco-conscious you turned off the devices at home. Some emergency comes up, and you need to access a file on your desktop. Now you can turn on your computer from anywhere in the world. With remote desktop software like VNC, you can use it as if you were sitting right in front of it. The best thing is that you can turn it off again to save power. Knowing that you don’t need a human intermediary to turn it on when you need it again, is excellent!
For those of you that begin to grasp what Tasker is all about, it’s imminent that you’ll find other great uses for it. You’ll likely discover some useful triggers to turn your desktop on and off. You could scan an NFC tag when arriving home or use GPS-based location detection to turn on your sleeping desktop computer, turn on the lights, start music, brew coffee or whatever :). Don’t turn into this guy though. This is just the beginning.