

When setting up Ubuntu in a VM, I ran into the HTTPS issue. Even the web admin of OpenLiteSpeed – and generally everything preferred SSL, despite the fact that it’s just a local server for web development. But of course, I didn’t have any certificates yet. When trying to concoct something, these problems, limitations, and annoyances quickly followed:
- I had absolutely no luck in adding self-signed certs to the trusted root, no matter how badly Let’s Encrypt wanted to convince me of it.
- While I have domains, I don’t want to be forced to have dev sites out in the open to satisfy webroot-based ownership verification (ACME client’s HTTP-01 challenge). Let’s Encrypt certs expire after just 90 days, so you’d need to make a site public during the recurring verifications (or at least I was led to believe that).
- The server’s IP is local but not necessarily the same as localhost. Certificates are for domains.
- Cloudflare’s free SSL only works in proxied mode, rendering my localhost speeds useless.
- My IP is dynamic.
It seems like a lost cause, but it’s not. Thankfully, there is a quick and elegant solution to set up HTTPS, which combines multiple things I have experience with. I want to show you how to get a wildcard SSL certificate for your local server, despite any difficulties. In a nutshell-spoiler: you’ll use a domain on Cloudflare purely for the DNS-01 challenge performed and automated by acme.sh, then point the domain to the server’s IP only in your hosts file. Let me expand this idea!
Overview of the solutions
ACME challenge problem
The local development server doesn’t need to be publicly-accessible on a domain to pass a challenge. I’ll make a dev site public whenever needed, but not for this. That’s why I switched to the lesser-known DNS-01 challenge during which I only need to prove domain ownership, not that the domain is pointing to anywhere in particular! Coincidentally, only this challenge allows the creation of wildcard SSL certificates.
Certificate expiry problem
Before an SSL certificate expires, it has to be renewed (and the challenge performed again). Of course, I want this done automatically, in a set it and forget it manner. Automation aligns with the philosophy of Let’s Encrypt. Thankfully, it’s possible to insert the TXT record (required for the ownership verification) to the DNS via the Cloudflare API. The ACME client I chose has built-in Cloudflare compatibility (dnsapi), so you can relax.
The problem of the local address
This is the easiest to solve and the crown jewel of the solution. You’ll use the hosts file to point the domain/subdomain to the local server’s IP. In the end, the SSL certificate will work for the domain, the browsers will not suspect a thing, and only you will gain access to the development sites, so you won’t need public DNS records.
Dynamic IP problem
Earlier, I wrote about how to use Cloudflare as a dynamic DNS, which should work on Ubuntu. This is only needed if you want to make a site on your local development server accessible by your team.
The Steps
What you’ll need:
- Local Linux server, this can be Ubuntu (optionally in a VM), or even a Raspberry Pi.
- A domain, which is not necessarily sacrificed for this purpose. Since you’ll have wildcard SSL, you can use its subdomains. If you don’t have a domain, you should get one with a meager renewal cost, such as .cyou at Namecheap.
- A Cloudflare account with your domain on it.
Note: Your actual web server may very well be Windows-based, and you can perform DNS validation from a separate (Linux) server and automatically copy certificates to your web server.
Domain and Cloudflare (for its API)
Buy a domain, and put it on Cloudflare – it’s free. I’ll assume you already have this, as it’s not in the scope of the article. However, getting an API Token and a Zone ID is.
- Copy the Zone ID to an empty file from your domain’s overview screen (right panel).
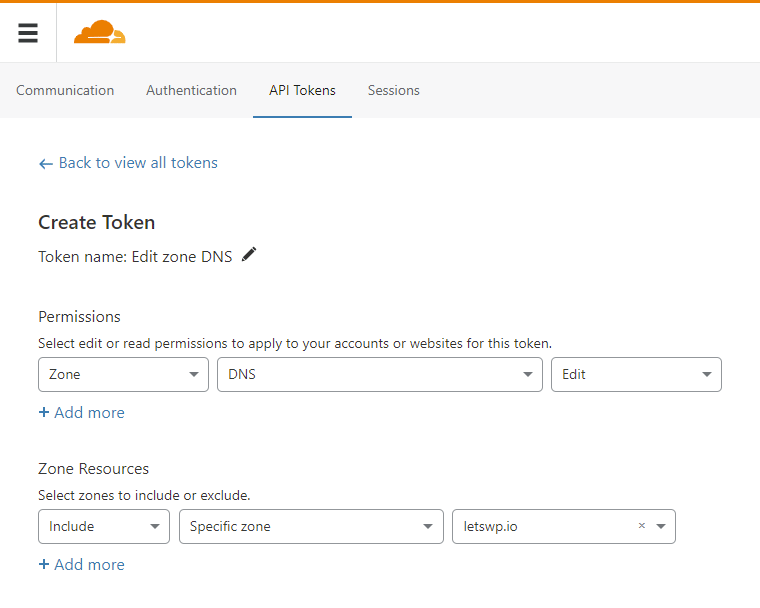
- Click Get your API token, then the API Tokens tab, Create Token button.
- In the row of Edit zone DNS, click Use template.
- In the last dropdown of Zone Resources, choose your domain.
- Continue to summary, and then Create Token.
- Copy the token; you need it for the next step.
If you have multiple domains…
Then you need Account ID instead of Zone ID, and you’ll export accordingly:
export CF_Account_ID="put_your_zone_ID_here"At Zone Resources, choose All zones instead of Specific zone. This includes all domains you got under the account with your email address.
You can keep adding them in the next section at the end of the line like:
-d example.com -d *.example.com -d example.io -d *.example.ioThe ACME client: acme.sh – this gets the SSL for the local server
I chose acme.sh for its recency and frequency of git commits and the least dependencies (not even Python). Furthermore, there is no separate “hook script” for Cloudflare. For a less all-in-one solution, a script called dehydrated, with cfhookbash could also work. In the past, I’ve used certbot but always wanted to try something new.
Log in as root (either via passwordless SSH or like the following way). You can do it as a regular user, but the web server’s restart command usually needs root. Therefore the renew task should also be under root’s crontab.
sudo passwd root
su -i
This will install acme.sh, set up an alias and add it to the cron.
curl https://get.acme.sh | shRestart your SSH session (for the alias), so you can continue with these:
export CF_Zone_ID="put_your_zone_ID_here"
export CF_Token="put_the_API_token_here"
acme.sh --issue -d example.dev --dns dns_cf -d *.example.dev
The SSL certificate will be valid for your domain and any subdomain. The first domain you specify will be the one this certificate is issued to. In the next step (the install), you’ll also identify it by the first domain. Extra domains at the end of the line will be added as SAN (Subject Alternative Name), meaning that anyone will be able to see the other domains the cert is good for. It’s okay for development, but not so good for production. The environment variables you exported are not persistent but acme.sh puts them in account.conf for later use.
Install the SSL certificate
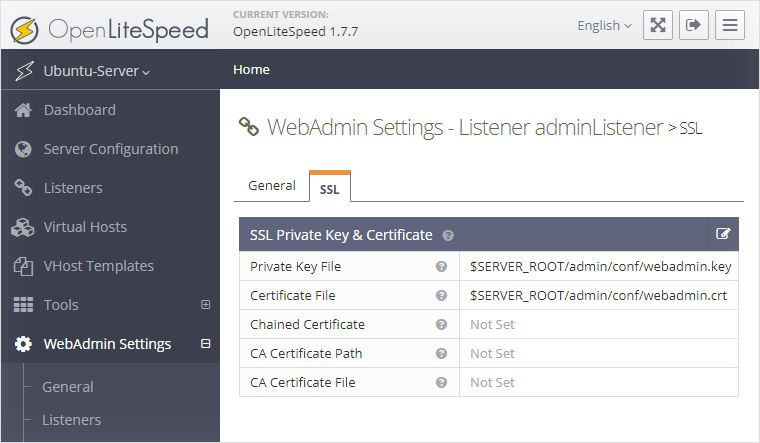
In my case, the webserver is OpenLiteSpeed, and you need to run one more line to install the SSL certificate to the local server:
acme.sh --install-cert -d example.dev --cert-file /usr/local/lsws/admin/conf/webadmin.crt --key-file /usr/local/lsws/admin/conf/webadmin.key --reloadcmd "/usr/local/lsws/bin/lswsctrl restart"This only needs to be done once, as acme.sh is smart enough to do this on every renewal. It keeps this information at example.dev.conf. Similar examples exist for Apache/Nginx.
OpenLiteSpeed-related note: This will install the SSL certificate at the path used by the web admin. So by the time of your first log-in, the SSL will already work! Later, when you create a new host for your site, just (re)use these paths for their certificates as well. Since it’s a wildcard SSL, and acme.sh can only auto-copy them to 1 place per configuration, let’s turn a blind eye to the fact their filename includes web admin (it doesn’t matter). When updating OLS though, you might need to run this line again! Once logged in, here is the configuration for the location of these files:
The hosts file
It’s such a simple file, but carries powerful possibilities. The hosts file sits deep within the Windows folder, so editing with admin access requires some trickery. Hit Windows+R and paste the following line:
notepad C:\Windows\System32\drivers\etc\hostsThen press Ctrl+Shift+Enter to edit it as an administrator (almost like a sudo). It has a simple syntax that consists of an IP followed by one or more hostnames. For example:
192.168.174.129 a.example.dev b.example.devBeing a local alternative to name resolution mechanisms, you can point any (sub)domain to an address of your choice.
Benefit #1 – Hijacking an existing live site’s address
You could make the host of your live site point to your local server. WordPress is sensitive to what address you installed it, and this can save a step of database-replacing a development address with the live one when manually deploying. With this trick, you can make UpdraftPlus backups on the development site and “restore” them on the live site. Since the addresses are the same, this is a smooth process.
Benefit #2 – Rapid creation of new test sites
You can keep coming up with new hosts all the time for your projects like anotheridea.example.dev, and point them all to the same local IP. If you’ve always wondered what makes a certain (sub)domain refer to an actual folder on the server… you are in luck! Some time ago, I wrote a popular tutorial on hosting multiple sites with OpenLiteSpeed. If you combine OLS, my configuration-reusing vhost approach, and the hosts file trick with the wildcard SSL, you can quickly create the place for local staging sites on the server. I know some 1-click solutions exist on hostings, but at least this one is yours and free!


Comments are closed.