

This article is closely related to our tutorial that teaches you how to move WordPress or create a staging site. That process is the prime example of when you’d run into the problem of hitting the import file size limit of phpMyAdmin. I haven’t run into this issue in the scope of anything else. I’ll show you BigDump, a Staggered MySQL Dump Importer (such a beautiful name!). While its documentation is helpful and brief, I think I could provide something extra. I’ll do this by sharing my insights about using this tool for WordPress site transfers. Sometimes you can’t or don’t want to bother with the server configuration merely to be able to import large SQL files.
Importing via BigDump feels faster than doing the same in phpMyAdmin. Part of this effect is the decoupling uploading from SQL execution. When you import large SQL dump files, they may take longer to upload, only to begin trying the actual import. If that fails, you need to upload again and again to retry, wasting time and bandwidth. BigDump allows you to place the dump next to it via FTP. More on this later.
The starting point assumes that you already have a database and you want to import a large SQL, but phpMyAdmin gave you the red light because of file size limits. You’ve already downloaded BigDump, right?
1. Prepare the BigDump file with access details
Since BigDump has nothing to do with WordPress, it can’t auto-populate database access details. You need to give it this information. Edit bigdump.php and fill this section according to your data:
// Database configuration

$db_server = 'localhost';
$db_name = 'bigdump_test_db';
$db_username = 'user_for_bigdump';
$db_password = 'XqTe6R7Fz3rf';
A little bit further along you’ll find this:
$linespersession = 3000;Change that to 5000 and scroll down some more.
$max_query_lines = 300;Change that to 4000 to prevent an issue. These help with something called “extended inserts”. The default way phpMyAdmin exports the SQL statements could result in a problem. We don’t want to deviate from the default phpMyAdmin options.
2. Upload it to your server
Choose any directory that is publicly accessible; it doesn’t even have to be the destination WordPress site’s folder. I’d rename bigdump.php to a random-looking file before upload, just so that bots and attackers can’t find it by scanning for known files. For me, this will be cranberryjuice.php today. Yes, you’ll only have this file on the server temporarily, but mistakes happen, and you could accidentally leave it there. Worse, an automated attack could coincide with the brief time window you are using this tool. Who knows?
3. Upload the SQL file via FTP too or choose it for upload
You’ll see whether or not you can import your large SQL file through the browser, based on its size. Sometimes you can get away with that method. However, the recommended way is to upload the .sql right next to your cranberryjuice.php file, so you are not subjected to limits. That’s why we are doing this in the first place. So, it’ll look like this as it can auto-detect .sql files next to it:
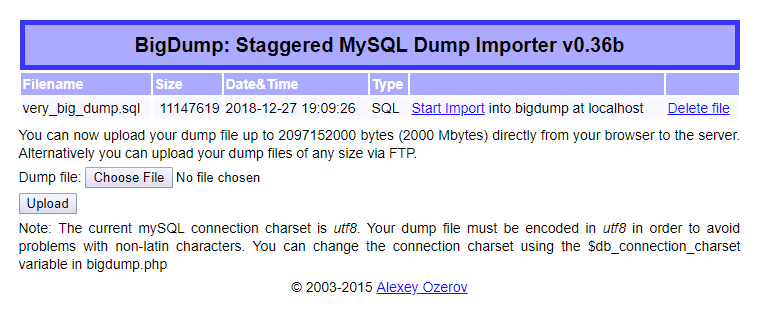
In case you were wondering: yes, point the browser to https://example.com/cranberryjuice.php – now you see why we changed the name: to make it harder for devious 3rd parties.
4. Let BigDump Import the Large SQL dump!
Upon clicking the Start Import link, you’ll see something like this:
I like how BigDump presents this better than the spinning loader of phpMyAdmin:

I like to check the end result with phpMyAdmin, to see if the size matches that of the source site.
Extra: A WordPress-specific investigation
As it turns out, there is a problem with importing backups made on an older version MySQL server, to a newer one. WordPress stores default dates as “0000-00-00 00:00:00”. MySQL 5.7 has brought new settings, and it prohibits zeroes for dates. It’s unlikely to have control over SQL modes, as your hosting sets them. You can see them for yourself in phpMyAdmin by running this SQL query: SELECT @@GLOBAL.sql_mode but don’t forget to tick Full texts in the + Options panel, because it’ll truncate the results with an ellipsis.
In my investigation, I tried three of our hosting providers, MDDHosting (MariaDB 10.1.37), A2 Hosting (MySQL 5.6.38), and non-AWS Cloud9 (MySQL 5.7.21) where I develop. I exported several different WordPress site’s databases and tried importing them using BigDump and phpMyAdmin. It worked in every possible direction (I performed 36 tests), except moving sites from MDD or A2 to Cloud9. Bummer!

It’s a mystery why an empty WordPress install with its minimal database was all right, though. The structure is where it’s supposed to fail (at the default “empty” values), and that’s the same for any WordPress site!
What happened on Cloud9?
Where it failed to import large SQL files, BigDump cited errors like:
- MySQL: Invalid default value for ‘post_date’
- MySQL: Invalid default value for ‘link_updated’
These correspond to the zeroes problem mentioned above. Interestingly, phpMyAdmin got tired and greeted me with a 502 error. Therefore, I wasn’t able to import the important sites into my preferred server. Not necessarily because of file size, but due to MySQL version limitations. This problem does not make BigDump any less useful, as this is not its fault! It works fine on regular hostings and can go around hard file size limits just fine.
I want to stress that the Cloud9 option here represents any server you have control over, such as a localhost XAMPP or a VPS or similar. As a side effect, it might not be configured as well as a proper hosting.
Who would’ve thunk? UpdraftPlus…
I got fed up with the failure of my tried-and-tested methods and wanted to see if our relatively new find works – moving sites with UpdraftPlus. I’m delighted to say that it worked beautifully on Cloud9 (substitute your favorite misconfigured environment)! All this with the free version of that plugin – so don’t think this is an upsell. So, check out the UpdraftPlus review. To have the best success rate, combine its “Restoring or copying a WordPress site with UpdraftPlus” part with steps 8-9 of my tutorial that uses the Search Replace DB tool… Thanks for participating in this exploration!