

A couple of years ago, when developing a WordPress plugin, I wanted to provide the possibility for users to customize certain texts via input fields on the admin panel. I was proud of it being so user-friendly until the moment when a customer complained that translating those texts via the WPML plugin didn’t work. Ouch, I didn’t even think about it, I was a beginner. At that time I had no clue about multi-language sites and never heard of WPML either.
The matter was urgent, so I had to come up with a quick fix. I started digging into the documentation of WPML looking for a solution. I had no time to understand how to properly register and print translatable texts then later apply all the changes throughout the code. Finally, I found what I needed. The [wpml-string] shortcode came to my rescue. We can use it for translating input texts without coding.
Initially, I intended to write a short review about this shortcode only, explaining how it works and how to use. However, once finished it, I felt that I should further research this topic. Though WPML is the most popular translate plugin, I wanted to investigate if there is a similar solution for the other well-known alternative, namely the Polylang plugin. Not because I thought translating input texts was such a common problem, but all the more annoying it could be. We’ll target those stubborn and seemingly untranslatable texts that remain in the other language. First, let’s take a look at the [wpml-string] shortcode, then end up with examining Polylang.
The [wpml-string] shortcode
The [wpml-string] shortcode is not part of the core WPML Multilingual CMS plugin. It requires the WPML String Translation plugin to be installed, which is part of the Multilingual CMS account type.
Once installed, you can use the shortcode as follows:
[wpml-string context="my-domain" name="my-name"]My string[/wpml-string]It accepts two attributes:
- context: It appears as a domain on WPML String translation screen. WPML organizes strings into different Domains (groups), making it easier to find a specific string. The Domain is a group of related strings. You can specify a human-readable format, for example, “My Plugin” or the textdomain you are already using in your code. Context will be created automatically, if not set.
- name: The name of the string helps the user understand what’s being translated. It will also be created automatically, if not provided.
Even though being optional, I strongly recommend setting the context and name for easier identification.
Under the hood
The WPML’s traditional 3-step translation process looks as follows (the order is important):
- Register strings for translation.
- Translate string by users.
- Read the translated strings.
Since translating itself requires human intervention (step 2), the shortcode can perform only steps 1 and 3 automatically. It registers a string for translation by calling the icl_register_string() function, unless it has been registered earlier. It then returns the translated version by calling the icl_t() function. To make strings available for translation on the WPML > String Translation page the shortcode should be run once. It means that you should first visit the page where you feature the shortcode before start translating.
Note: As of version 3.2, the wpml_register_single_string and wpml_translate_single_string action hooks are preferred over icl_register_string() and icl_t() functions, however the deprecated functions can still be used. The WPML String Translation plugin’s WPML_String_Shortcode shortcode handler class still uses them. If you are just getting started with string translation in WPML, then please check out its documentation to make sure you apply it according to the latest standards.
How it works with input texts
To demonstrate how it works exactly, I used a little plugin that I made for this purpose only, which you can download by the download button below.
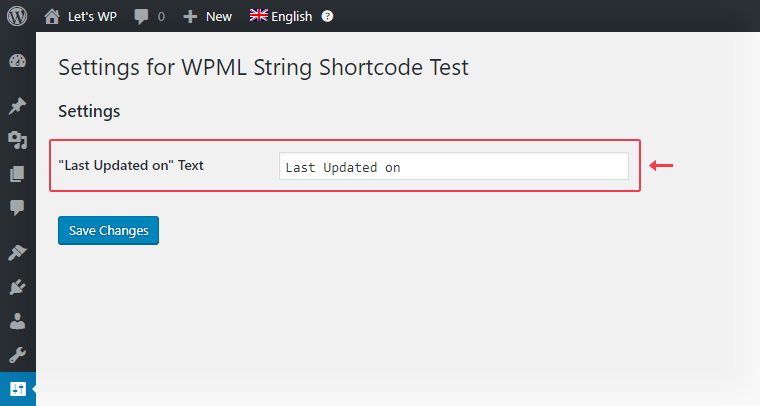
But what does this plugin do exactly? It appends the last updated date to the end of each blog post in the following in format: “Last Updated on {date}”. The “Last Updated on” text comes from the database. You can change this text to something else, for example: “Last Edited “, via a text input on a previously registered settings admin page. Our goal is to translate it to Spanish with the [wpml-string] shortcode.
This is how the test plugin admin screen (Settings > Let’s WP – WPML String Shortcode Test) looks like after activation:
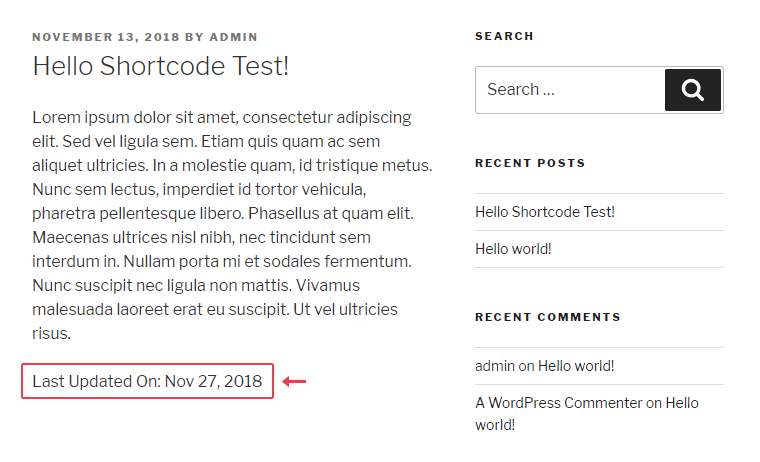
The result looks as follows on the blog single page:
The shortcode that registers our string for translation:
[wpml-string context="Lets WP Shortcode Test plugin" name="Last Updated on"]Last Updated On[/wpml-string]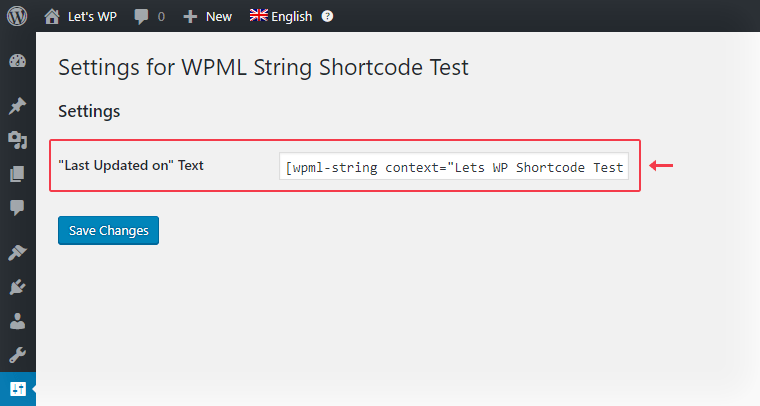
After saving changes, we should visit the front-end page of the blog single, where we can’t see any changes yet. However, this first visit, when the shortcode runs for the first time, registers the text for translation. This ensures that our text appears on the String Translation screen. Now, we can translate it.
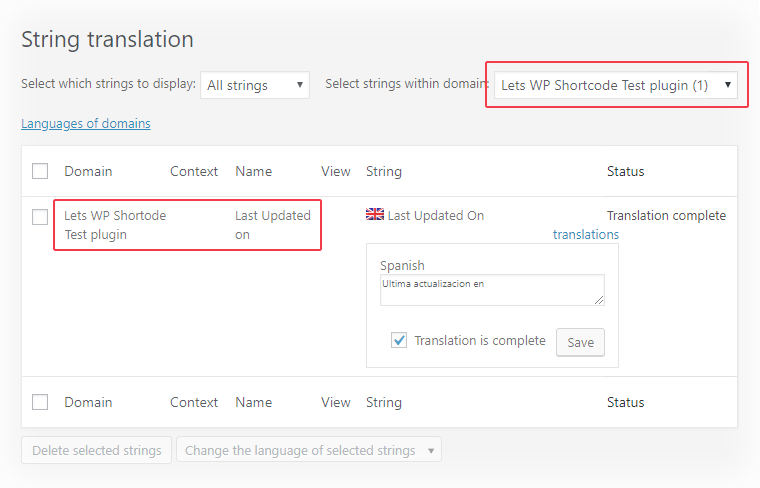
The Spanish version of the blog single, where “Last Updated On” is replaced with “Ultima actualizacion en”.

Polylang plugin
Unfortunately, Polylang, the most popular free translation plugin doesn’t offer a similar, on-the-fly, shortcode based translation feature. However, this prompted me to try to create the solution myself, and it didn’t seem like an impossible mission at all. On the one hand, we already know exactly what happens under the hood of WPML shortcode. On the other hand, Polylang does support most of the WPML API, including the icl_register_string(), and icl_t() functions, and this is the key to a quick solution as you will understand later.
Unlike to WPML, that stores strings in the database after calling icl_register_string() function once, Polylang doesn’t store strings in the database. It builds the translatable data dynamically at runtime by collecting strings from each pll_register_string() function call. Thus, to make strings available for translation on the Languages > Strings translations admin page, we should call this function on every admin page request. This behavior principle doesn’t allow us creating the WPML-like the shortcode out of the box. Fortunately, the WPML API support comes extremely useful in this case. Polylang’s versions of the icl_register_string() and icl_t() functions are not only aliases for their own string translating functions, namely the pll_register_string() and pll__() functions, but they save and read data from the database just like WPML does. As mentioned earlier, this is very important, because we shouldn’t figure out own ways to register string permanently.
To register the shortcode, insert the code below like this to your WordPress site.
/**
* Shortcode function to register and translate string with Polylang
*
* @param array $atts Shortcode attributes.
* @param string $string String to translate.
* @return string Translated string.
*/
function lwp_pll_string_shortcode( $atts, $string = '' ) {
// Ensure that Polylang is active and required functions are available
if ( !defined( 'POLYLANG_BASENAME' ) || !function_exists( 'icl_register_string' ) || !function_exists(
'icl_t'
) ) return $string;
extract(
shortcode_atts(
array(
'context' => 'lwp-pll-shortcode',
'name' => 'lwp-pll-shortcode' . md5( $string )
),
$atts
)
);
// Ensure to register a string once
$exists = PLL_WPML_Compat::instance()->get_string_by_context_and_name( $context, $name );
if ( $exists === false ) {
icl_register_string( $context, $name, $string );
}
return icl_t( $context, $name, $string );
}
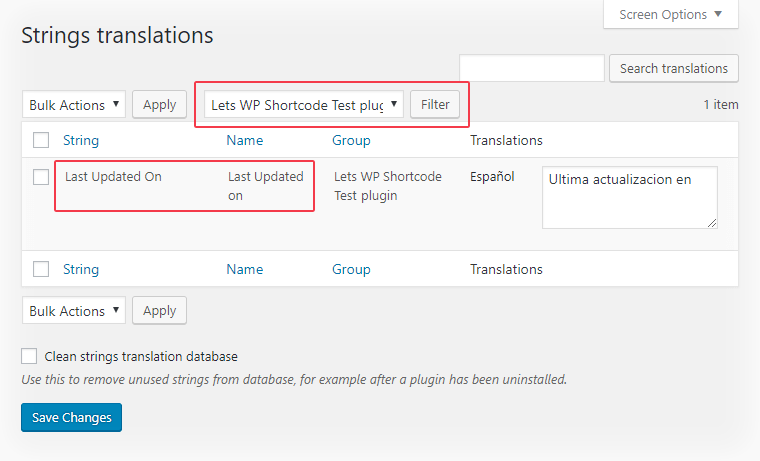
add_shortcode( 'lwp-pll-string', 'lwp_pll_string_shortcode' );The [lwp-pll-string] shortcode that registers our string for translation in Polylang plugin:
[lwp-pll-string context="Lets WP Shortcode Test plugin" name="Last Updated on"]Last Updated On[/lwp-pll-string]Its use is exactly the same as previously described for the other shortcode. After inserting into the text input field, visit the front-end page of the blog single, then we can start translating on the Polylang Strings translations page:
Conclusion
Although using shortcodes may not be the optimal way for string translations, the solution can be extremely handy when plugin or theme developers don’t provide any alternative for translating input texts. It allows us to make entire websites multilingual without modifying the original codebase. As seen, while it works out of the box with the WPML’s [wpml-string] shortcode, Polylang users should first apply the result of our small DIY project.
Happy translating!


Comments are closed.